Jan Sanchez

RaptureXML and AFNetworking

If you are like me, who loves to use RaptureXML for parsing XML documents, and to use AFNetworking when playing with REST APIs, then this post is for you.

I created an AFNetworking extension to make it easy to use RaptureXML.

Here is a sample on how to use it:

1
2
3
4
5
6
7
AFRaptureXMLRequestOperation *operation = [AFRaptureXMLRequestOperation XMLParserRequestOperationWithRequest:[NSURLRequest requestWithURL:[NSURL URLWithString:@"http://legalindexes.indoff.com/sitemap.xml"]] success:^(NSURLRequest *request, NSHTTPURLResponse *response, RXMLElement *XMLElement) {
   // Do something with XMLElement 
} failure:^(NSURLRequest *request, NSHTTPURLResponse *response, NSError *error, RXMLElement *XMLElement) {
    // Handle the error
}];

[operation start];

If subclassing AFHTTPClient then we just need to use registerHTTPOperationClass to register it with AFRaptureXMLRequestOperation

1
2
3
4
5
6
7
8
9
10
11
12
13
- (id)initWithBaseURL:(NSURL *)url {
    self = [super initWithBaseURL:url];
    if (!self) {
        return nil;
    }

    [self registerHTTPOperationClass:[AFRaptureXMLRequestOperation class]];

    // Accept HTTP Header; see http://www.w3.org/Protocols/rfc2616/rfc2616-sec14.html#sec14.1
    [self setDefaultHeader:@"Accept" value:@"text/xml;level=1,application/xml;level=2"];

    return self;
}

I created this extension several months ago, but recently updated it to use ARC and included some minor tweaks based on some official extensions. Feel free to play around with it, fork it and send any pull requests.

Fading in UIImageView

It is always better to fade in image as they load, as this leads to great user experience. It is much better than just have the images abruptly appear. In order to achieve this we can make use of CATransition which is a subclass of CAAnimation.

If you are fetching remote images, a great framework to use is SDWebImage. The following sample code assumes you are using this framework.

1
2
3
4
5
6
7
8
9
10
11
12
13
// We need this import as we'll be adding the animation to the UIView's layer
#import <QuartzCore/QuartzCore.h>

// Let's say we have UIImageView *imageView 
[imageView setImageWithURL:[NSURL URLWithString:@"http://example.com/example.png"] completed:^(UIImage *image, NSError *error, SDImageCacheType cacheType) {
    if (image) {
        CATransition *transition = [CATransition animation];
        transition.type = kCATransitionFade; // there are other types but this is the nicest
        transition.duration = 0.34; // set the duration that you like
        transition.timingFunction = [CAMediaTimingFunction functionWithName:kCAMediaTimingFunctionEaseInEaseOut];
        [imageView.layer addAnimation:transition forKey:nil];
    }
}];

You can also customize the direction of the transition using the subtype property of the CATransition.

This is a quite nice feature if you have a UITableView displaying lots of images.

UITextField and attributedPlaceholder

I wanted to do a custom format placeholder text in a UITextField and found out about the attributedPlaceholder property on the documentation.

Great! That should be easy.

1
2
3
4
5
6
7
NSDictionary *textAttributes =
      @{ NSFontAttributeName : [UIFont italicSystemFontOfSize:15.f] };
NSAttributedString *attributedPlaceholder =
      [[NSAttributedString alloc] initWithString:@"Placeholder"
                                      attributes:textAttributes];
// Assume we already have created UITextField *textField
[textField setAttributedPlaceholder:attributedPlaceholder];

So I ran the build and the placeholder should be italic as I wanted, right? WRONG!

Apparently, this is a bug. And if you had read until this line, please go and file a bug report to Apple so they can fix this.

Now, there are some workarounds for this problem. The one I ended up using is to subclass UITextField and override drawPlaceholderInRect:

1
2
3
4
5
6
7
- (void)drawPlaceholderInRect:(CGRect)rect {
  // Set to any color of your preference
  [[UIColor lightGrayColor] setFill];
  // We use self.font.pointSize in order to match the input text's font size
  [self.placeholder drawInRect:rect
                      withFont:[UIFont italicSystemFontOfSize:self.font.pointSize]];
}

It is possible to make this subclass more general and use NSAttributedString’s drawInRect: if attributedPlaceholder is set. But for my requirements the above snippet was enough.

State of iOS XML Libraries in 2013

When it comes to XML parsing in iOS, developers usually first stumble upon NSXMLParser. NSXMLParser is a SAX Parser included on the iOS SDK. While it works fine, developers usually end up writing tons of lines to parse XML documents.

There are better and faster alternatives to work with. I personally enjoy working with RaptureXML. There are different factors when deciding which XML libary to choose. Often, the most common is speed.

Currently, there is no much data on speed tests. The usual source for this data is this dated (March 2010) excellent blog post. On it, the author checks various libraries and performs tests based on Apple’s source.

Since then, several of these libraries have been updated and some new libraries have become available as well. Not to say, that we have now multi-core devices such as the iPhone 5. Therefore, I updated the source code to include the latest versions of the XML libraries and included a few more.

Libraries tested

All the tests were performed on an iPhone 5, each of them ran 10 times. Here’s a chart with the results:
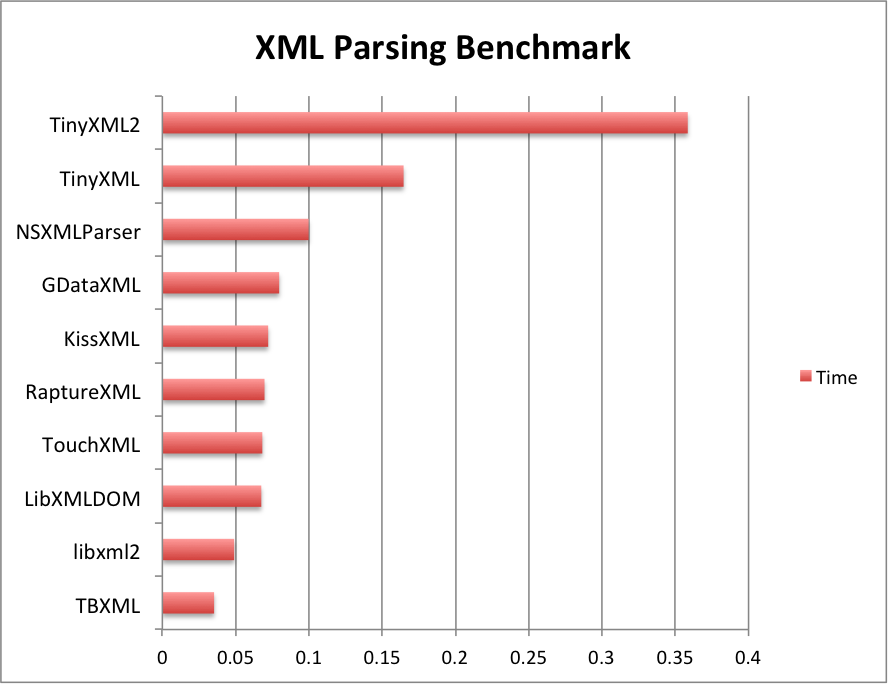
The fastest library was TBXML and most of the libraries finished within 0.01 seconds. It was a surprise that TinyXML2 came last, taking double the time of TinyXML.

From this tests one can conclude, that under modern hardware, the choice of speed does not matter that much as most of the libraries perform very similarly. The choice breaks down to a matter of preference, to which library you enjoy the most working with.

The code for this test can be found on my repo. Feel free to fork it and improve any of the tests, specially if they will help making the parsing faster.

I am planning on revamping these benchmarks based on a similar test but for JSON Parsing. It is currently a work in progress.

Using UIImagePickerController

Have you ever found the need in your app to let the user take a Picture or choose one from the Camera Roll? Follow and find how easy is to add this feature to your app.

The iOS SDK provides a native controller that handles the hard bits for you. This controller is UIImagePickerController.

1
2
3
4
5
6
UIImagePickerController *pickerController = [[UIImagePickerController alloc] init];
pickerController.sourceType = UIImagePickerControllerSourceTypeCamera;
pickerController.delegate = self;
[self presentViewController:imagePickerController
                   animated:YES
                 completion:NULL];

In this particular example it will bring the camera. There are other options as well.

1
2
3
4
5
6
// This will bring the Camera
pickerController.sourceType = UIImagePickerControllerSourceTypeCamera;
// Option for showing the photo library
pickerController.sourceType = UIImagePickerControllerSourceTypePhotoLibrary;
// This will just show the photos / videos view
pickerController.sourceType = UIImagePickerControllerSourceTypeSavedPhotosAlbum;

Note that the last two options require users to allow the app to access their photos / videos.

Don’t forget to check if the source type is available:

1
2
3
4
if ([UIImagePickerController isSourceTypeAvailable:UIImagePickerControllerSourceTypeCamera]) {
  // Set sourceType to UIImagePickerControllerSourceTypeCamera
  // and present controller
}

If you do not care about movies, just still images we can set the media typpe to kUTTypeImage.

1
2
3
#import <MobileCoreServices/MobileCoreServices.h>
// Don't forget to add MobileCoreServices.framework to the project
pickerController.mediaTypes = @[(NSString *)kUTTypeImage];

This class also supports the ability to let users crop and scale pictures. This is very useful if want to get square pics, for instance to update a social profile picture.

1
pickerController.allowsEditing = YES;

To get the actual image that users picked we implement one of UIImagePickerControllerDelegate methods.

1
2
3
4
5
6
7
8
9
10
11
12
13
- (void)imagePickerController:(UIImagePickerController *)picker
didFinishPickingMediaWithInfo:(NSDictionary *)info
{
  [self dismissViewControllerAnimated:YES completion:NULL];
  // UIImagePickerControllerEditedImage is useful if you allowed
  // editing of images
  UIImage *image = [info objectForKey:UIImagePickerControllerEditedImage];
  if (image == nil)
    image = [info objectForKey:UIImagePickerControllerOriginalImage];

  // Do something with the image

}

As you can see, UIImagePickerController is quite easy to implement and it has lots of options that you can make use of. It also allows you to set a custom overlay and define your own camera buttons.

This sample code can be found in my GitHub repo.

Simple GeoJSON Viewer

In order to visualize GeoJSON polygons for Apple Maps I built a simple GeoJSON Viewer. I built it since there wasn’t anything similar. It uses Google Maps.

Right now, it covers the GeoJSON features that Apple supports for their Maps. Perhaps, in the future I will include full support for GeoJSON.

Check the demo or fork it.